High-value assets like database servers are always a target for hackers. Typically, these types of services hold valuable information like client details, credit and debit card numbers and service details. When creating a network design is important. So, to protect services like databases, you could use a secure MySQL server on an internal network. Unlike a Remote MySQL Database, an Internal MySQL Database sits on an isolated internal network.
It’s impossible to connect to the internal network from outside of the network. This means if your production server was ever compromised, your database would be located inside another server. The F2H blog utilizes an Internal MySQL database. You are currently downloading information from our blog using a centralized database server located at 10.10.10.250. Whilst we could also add a public IPv4 to this server, that would potentially open up security concerns. so this guide deals with internal networking only.
On the First2Host network, all Discovery NVMe VPS instances can use the internal network. You can network instances together in the same region and connect to them using a private IP. This assumes you already have an internal instance and a production instance in the same location. Let’s begin.
Create a Secure Internal MySQL Database Server
Order an NVMe VPS and select the Internal Instance addon. We’re using Ubuntu 20 LTS because that has an EOL of 2030. No one likes updating MySQL servers so try to use the OS distribution that has the longest support.
apt install gnupg
apt install lsb-release
cd /tmp
wget https://dev.mysql.com/get/mysql-apt-config_0.8.19-1_all.deb
dpkg -i mysql-apt-config*
apt update
apt install mysql-server -y
If, at this point, you see an error about a key. Just add the key displayed in your console with the command below. The error will look something like this;
GPG error: http://repo.mysql.com/apt/ubuntu focal InRelease: The following signatures couldn't be verified because the public key is not available: NO_PUBKEY 467B942D3A79BD29

# Add Key
sudo apt-key adv --keyserver keyserver.ubuntu.com --recv-keys 467B942D3A79BD29
apt update
apt install mysql-server -y
MySQL is now installed. Start and enable the service on boot.
systemctl start mysql
systemctl status mysql
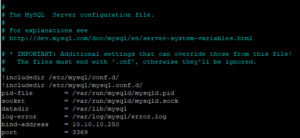
systemctl enable mysqlNow we need to tell MySQL what IP to listen on. Your internal instance is delivered with a 10.10.10.x IP. So, open up the my.cnf file and add the code below. Replace xx.xx.xx.xx with your internal IP. If you want to use a custom port, which is advised. Enter it in the port field. Save and close the file then restart MySQL with systemctl restart MySQL.
nano /etc/mysql/my.cnf

!includedir /etc/mysql/conf.d/
!includedir /etc/mysql/mysql.conf.d/
pid-file        = /var/run/mysqld/mysqld.pid
socket          = /var/run/mysqld/mysqld.sock
datadir         = /var/lib/mysql
log-error       = /var/log/mysql/error.log
bind-address    = xx.xx.xx.xx
port            = 3306
At this point, you should be able to ping your production server’s internal IP from your internal instance. To be sure, issue the ping command to ensure you can connect. If you can’t you will likely need to configure the internal IP in your production instance.
Production Server Networking
Right first, make sure you have an Internal IP assigned to your production instance. View the guide on how to complete this. Use the commands below to configure the IP in your networking.
CentOS
The code below configures your Internal IP on eth1. Your public network will be on eth0. Replace the XX sections with your internal networking information displayed in your control panel. After, restart the networking or your server. You could also use ifup eth1.
nano /etc/sysconfig/network-scripts/ifcfg-eth1

BOOTPROTO=none
DEFROUTE=yes
DEVICE=eth1
GATEWAY=xx.xx.xx.xx
IPADDR=xx.xx.xx.xx
NETMASK=255.255.255.240
Assuming all went well you should not be able to ping each instance from each other.
Create MySQL Database and user
Next, back in your internal instance let’s access MySQL and create our database and user.
mysql -u root -p mysqlRun the following commands and change the sections for the user, database and password.
# Create Database
CREATE DATABASE database_name;

# Create User
CREATE USER 'database_user'@'%' IDENTIFIED BY 'database_password';

# Allow Privileges
GRANT ALL ON *.* TO 'database_user'@'%';

# Flush Privileges
flush privileges;
Allow Remote Access
Even though this is an internal database we still need to allow access to it. So, run the commands replacing the IP with your production server’s internal IP
update db set Host='10.10.10.x' where Db='database_name';
update user set Host='10.10.10.x' where user='database_user';
Import Existing Database
Finally, you are ready to import an existing database if you have one or you should not be able to use the database details to install an application like WordPress. So to import an existing database dump the SQL file on your internal instance. You will have outgoing IPv4 access to get the file if required.
mysql -u database_user -p database_name < backup.sql
Connect To Internal MySQL database server
Our example below shows the settings you would use to connect a WordPress site to the internal database server you just created. Make sure you specify the port to connect to in the host field.
define('DB_NAME', "database_name");

/** MySQL database username */
define('DB_USER', "database_user");

/** MySQL database password */
define('DB_PASSWORD', "database_password");

/** MySQL hostname */
define('DB_HOST', "10.10.10.254:3369");
You should now have a working secure MySQL database server, isolated on our internal network. You can use the Network Firewall to configure rules to block incoming traffic over IPv4 if you have a dual connection with public and private networking.