


In this article for the Postfix email server series, we will look at configuring our existing Postfixadmin servers for high availability. Postfix High availability email provides redundancy for all email users. Should one of the Postfix email servers fail. The redundant Postfix email server will process mail while the other is fixed. In the third article of this series titled Install Postfixadmin on Ubuntu Postfix Email Servers. We installed Postfixadmin. When we did this we laid the groundwork for high availability email by configuring our database using a MariaDB Galera Replication Cluster. We will also configure RoundCube Webmail for high availability.
Since Part 3. Our Postfixadmin database has been replicating to a duplicate server called m2.relay.gb.net. This is the very core of our Postfix High Availability platform. The duplicate email server holds a copy of our Postfix database. However, it won’t currently have a copy of our mailboxes because these are stored on m1.relay.gb.net in the /var/vmail folder. If you followed our previous guides you should have a copy of Postfixadmin configured to run from /var/www/postfixadmin in the second server.
Required Infrastructure
To complete this guide and successfully High Availability for Postfix you will need a total of 4 NVME VPS Servers and 1 High Availability VPS Server running Ubuntu. We have created a bundle of 4 servers for users to purchase. These will be delivered with 100GB NAS storage already mounted to /nas in each backend server. Order Here or Contact Us.
- 3x NVMe VPS Servers (Backends)
- 50GB HDD
- 4 vCore
- 5GB Ram
- 100GB NAS Storage (mounted at /nas in each server)
- 1x Cloud VPS (Balancer)
- 10GB HDD
- 2 vCore
- 2 GB Ram
Save 15% off each server with the promotional code BPIBQ69YH6
Articles In This Series
- Part 1 – Install Postfix on Ubuntu Servers
- Part 2 – Install Dovecot IMAP/POP3 with SSL/TLS
- Part 3 – Configure Postfix DKIM & SPF Records
- Part 4 – Install Postfixadmin on Postfix Ubuntu Servers
- Part 5 – Install RoundCube Webmail on Ubuntu Postfix servers
- Part 6 – Configure Multiple Email Domains in Postfix Email Server
- Part 7 – Configure PostFixAdmin and RoundCube High Availability Email Servers (This Article)
- Part 8 – Configure DKIM, SPF and DMARC on Second (multiple) Postfix Email Servers
- Part 9 – Load Balance PostFixAdmin, RoundCube and Postfix Email
Data Redundancy
Before proceeding take a backup or snapshot of each Postfix server. We’re going to be making some extensive changes to the core configuration of our Postfix and Dovecot configuration files and also to our web server, LiteSpeed. Don’t make any changes without functioning backups. Email has high availability built into it via the MX records. If one MX record isn’t resolving the next MX record will be tried. However, if our primary server ever went offline, we would not be able to access Postfixadmin until the server has been repaired. That’s because at the moment our Postfixadmin files are located in the m1.relay.gb.net server and the A record is pointed to the server. We’re going to load balance connections for email and Postfixadmin over our two Postfixadmin servers using HAProxy.
Shared Storage
To configure PostFixAdmin High Availability environment we must make sure that the Postfixadmin files and mail directories are accessible from each server. In this series, we are using the server names m1.relay.gb.net and m2.relay.gb.net. If you followed Part 4 of this series you have the Postfixadmin files on both servers already. But this means you need to update each Postfixadmin server when a new version comes out. In this guide, we are mounting a network share in each of our Postfixadmin servers. Without shared storage, you cannot provide High Availability to Postfix reliably. You could use LSYNCD to copy data from one server to another and do the same on that server to copy data to the original server but it’s messy as hell. If possible use shared storage.
Configure Postfix For High Availability
In Part 1 we configured Postfix for virtual mailboxes to be stored at /var/vmail. This is specified in the /etc/postfix/main.cf file. The section looks like this.
virtual_uid_maps = static:2000
virtual_gid_maps = static:2000
virtual_mailbox_base = /var/vmail
virtual_minimum_uid = 2000
Similarly, in Part 2 when configuring Dovecot in the /etc/dovecot/conf.d/10-mail.conf file, we specified the location for Dovecot to deliver mail to. That block looks like this.
mail_location = maildir:~/Maildir
mail_home = /var/vmail/%d/%n/
The virtual mailboxes need to be accessible from any server and at the moment Postfix and Dovecot are using a local address (/var) on m1.relay.gb.net. If we ls the directory we can see our existing domains configured in PostFixAdmin.
root@m1:/# ls /var/vmail
relay.gb.net  rxxxxxxxxxx.xyz  vxxxxxxxs.xyz  xxxx.pw
Think About This
Let’s pause because this is important. Inside the /var/vmail folder isn’t just the directories to deliver mail to. Some really important files like the dovecot.index.cache files are located here. We are going to be moving these folders to our shared storage. We’ve mounted a network share in m1 and m2 at /nas. However, when our PostFixAdmin High Availability servers are configured, we will add a load balancer. There is the possibility that multiple connections could be made to the index files. Dovecot cannot. CANNOT handle files being edited at the same time. If this happens you will suffer serious mailbox corruption. So to get around this we need to tell Dovecot to reference indexes stored locally on the High Availability Postfix servers. We will come back to this later. For now, we need to move our PostFixAdmin and RoundCube files to the NAS so they are accessible from either server.
PostFixAdmin High Availability
Now we need to copy the PostFixAdmin files to the NAS. If you followed part 4, these are located at /var/www/pfadmin.domain.com. Copy the entire virtual host file to the NAS.
cp -R /var/www/pfadmin.domain.com /nas/wwwRoundCube High Availability
And whilst we are making everything highly available, let’s configure RoundCube for High Availability. If you followed Part 5 of this series. You also have RoundCube installed to /var/www/webmail.relay.gb.net. Copy the entire virtual host folder to the NAS.
cp -R /var/www/webmail.relay.gb.net /nas/wwwCorrect Permissions
You likely just copied files as the root user. The permissions on the virtual host files in the NAS will be incorrect. Correct the permissions to grant your web server access to them.
chown -R www-data:www-data /nas/wwwModify Virtual Hosts
From here on in, we are back to making changes on both of our Postfix High Availability servers. On the first Postfix server (m1.relay.gb.net) login to the LiteSpeed control panel.
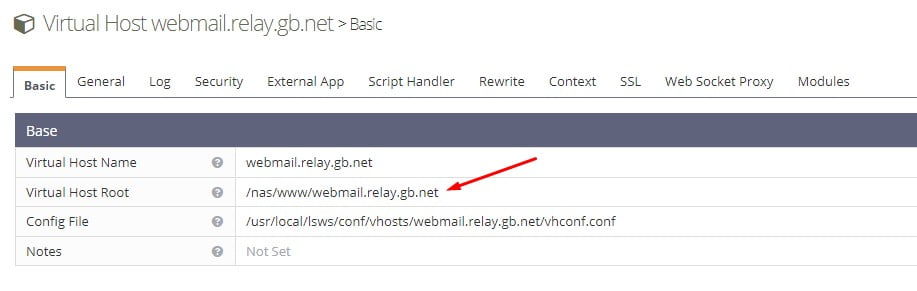
https://151.xx.xx.86:7080/Navigate to Virtual Hosts and select the virtual host for Webmail. webmail.relay.gb in our case. Update the Virtual Host Root to reflect the path to the RoundCube files located in the NAS. Our virtual host now looks like this.
Now restart LSWS and try to access your RoundCube Webmail. There should not be any errors. If you see errors. Check the permissions. Ours are as follows.
  File: /nas/www/webmail.relay.gb.net
  Size: 25              Blocks: 17         IO Block: 131072 directory
Device: 32h/50d Inode: 471         Links: 13
Access: (0755/drwxr-xr-x)  Uid: (   33/www-data)   Gid: (   33/www-data)
Access: 2024-03-31 16:47:27.553958000 +0100
Modify: 2024-03-31 16:48:20.146515000 +0100
Change: 2024-03-31 17:38:15.572880000 +0100
 Birth: -
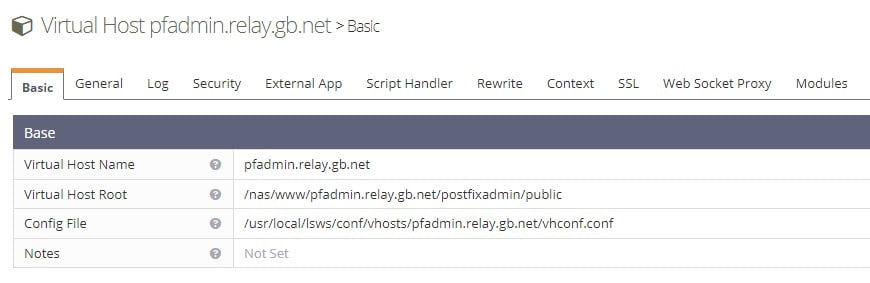
Assuming Webmail still functions, carry on with the PostFixAdmin High Availability. Repeat the process and update the path to the PostFixAdmin files located in the NAS. Ours looks like this.
Restart LSWS and try to access PostFixAdmin. You should still be able to log in fine. We experienced some issues at this point. Restarting the detached PHP sessions cleared this up.
systemctl restart lsws && killall - 9 lsphpNow we can access PostfixAdmin and the files are being served from the NAS.

So now we have both RoundCube and PostFixAdmin being served from network attached storage from our m1.relay.gb.net Postfix server. Magic! So let’s now turn our attention to our second server. m2.relay.gb.net.
PostFixAdmin High Availability – m2.relay.gb.net
So far we haven’t touched our second server. In Part 4 – Install Postfixadmin on Postfix Ubuntu Servers, we configured database replication so our database is already located on this server. We also installed PostFixAdmin to the /var/www directory. We did this because some users won’t have access to NAS storage. This group of people will likely be trying to replicate the mail storage with something like LSYNCD. I’m not covering that here because it’s really messy and you shouldn’t do it.
But if you are doing that, you just need to set up PostFixAdmin on the second server like you did with the first. But remember to use the same database details from the first server in the second server. Moving on. In the second server’s LiteSpeed control panel, we need to update the paths to also reflect the RoundCube and PostFixadmin files located in the NAS. Repeat the process you just completed above on the second server.
Virtual Host Configuration
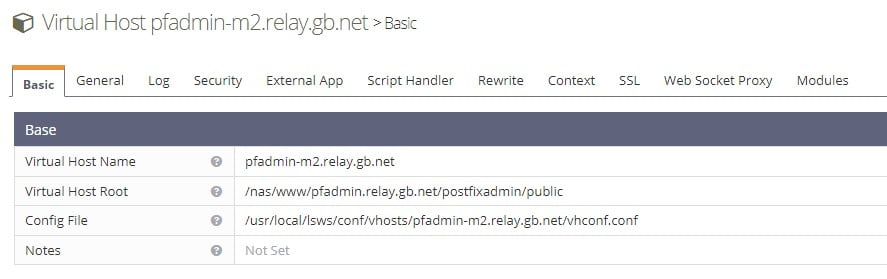
However, this time for PostFixAdmin. Configure it to use a different URL. Our second copy of PostFixAdmin is configured to work from https://pfadmin-m2.relay.gb.net/. Our virtual host in m2.relay.gb.net looks like this.
Test PostFixAdmin
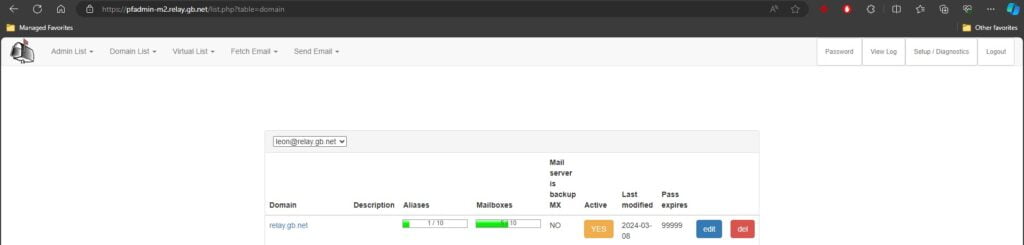
We’re configuring PostFixAdmin on a second subdomain for now because it’s easier to test that everything is working. Later on, we will unify the virtual hosts ensuring they are the same for load balancing. If you now try to access PostFixAdmin on the new subdomain working off the second server. It should work and you should be able to log in.
You do not need to do the same for Webmail on the second VPS Server. If you have Webmail installed just create a new virtual host and update the path of the files to reflect the ones in the NAS.
/bin/bash <( curl -sk https://raw.githubusercontent.com/litespeedtech/ls-cloud-image/master/Setup/vhsetup.sh ) -d webmail.relay.gb.netWe can confidently say Webmail will be working because PostFixAdmin is. Next, let’s get down to the details in PostFix and DoveCot. Snapshot and Backup your work before proceeding.
PostFix High Availability Configuration
First. Move the mail store from /var/vmail. You are moving the mail storage to the NAS.
cp -R /var/vmail /nas

mkdir -p /var/dovecot/indexes

cp -R /var/mail /var/dovecot/indexes
Now correct the permissions. The /nas/vmail folder needs to be owned by vmail and in the vmail group. We’re also placing a copy of the existing mail folders and indexes at /var/dovecot/indexes. More on this in a bit.
chown -R vmail:vmail /nas/vmail

chown -R vmail:vmail /var/dovecot/indexes/
m1.relay.gb.net
In the first server open up the /etc/postfix/main.cf file.
nano /etc/postfix/main.cf
Locate the following line and update it to point to the NAS vmail folder. Restart Postfix.
virtual_mailbox_base = /var/vmail

virtual_mailbox_base = /nas/vmail

systemctl restart postfix
m1.relay.gb.net
Repeat the same process above. Configure Postfix to point to the vmail folder in the NAS.
Dovecot High Availability Configuration
This bit is slightly more tricky. Remember that above we pointed out the indexes need to be stored locally? Now is the time to configure this. Do not miss this step. I cannot stress this enough. You will lose email data if your indexes are located on shared storage. Again in the first server;
m1.relay.gb.net
Make the Postfixadmin High Availability indexes store.
mkdir -p /var/dovecot/indexes

cp -R /var/mail /var/dovecot/indexes

chown -R vmail:vmail /var/dovecot/indexes/
Open up the /etc/dovecot/conf.d/10-mail.conf file and locate the mail_location = line. At the moment it will look like this.
mail_location = maildir:~/MaildirComment that out and replace it with the below.
#mail_location = maildir:~/Maildir
mail_location = maildir:~/Maildir:INDEX=/var/dovecot/indexes/%Ld/%Lu/
We’re separating the indexes here. Above we copied the virtual mail folders and indexes to /var/dovecot/indexes. Next, locate the mail_home = line. It will look like this.
mail_home = /var/vmail/%d/%n/Comment it out and replace it with the below.
#mail_home = /var/vmail/%d/%n/
mail_home = /nas/vmail/%d/%n/
m2.relay.gb.net
So next, repeat this process on the second server. Copy the indexes to a local folder.
mkdir -p /var/dovecot/indexes

cp -R /var/mail /var/dovecot/indexes

chown -R vmail:vmail /var/dovecot/indexes/
Remember to update Dovecot to point to the vmail folders in the NAS as we have just done on the first server. Afterwards, Restart Dovecot and Postfix on both NVMe VPS Servers.
systemctl restart dovecot postfixTest Configuration
Now is the time to test if the first server is still working. You should have any existing mail in your inboxes and you should be able to send and receive mail. If mail is missing from existing email accounts you have made a mistake. Things to check;
- Go over the /etc/dovecot/conf.d/10-mail.conf and /etc/postfix/main.cf files and double-check the settings.
- Check the permissions on /nas/vmail and /var/dovecot/indexes.
- Ensure the Dovecot user is in the www-data group ( usermod -aG dovecot www-data )
Recap
So far in part 7, we have configured both of our Postfix servers to serve the PostFixAdmin and Roundcube files from shared storage. We configured database replication in part 4. We’ve confirmed PostFixAdmin works on both servers from shared storage but we didn’t confirm Webmail would work.
RoundCube Webmail On the Second Server
On our second server we haven’t followed the steps defined in Part 5 – Install RoundCube Webmail on Ubuntu Postfix servers. That’s because we just copied our original work to the NAS. Our database was already set up. All we needed to do was to create a virtual host on m2.relay.gb.net. So, before testing Webmail from the second server. Install the required PHP modules on the second server.
apt install lsphp81-intl lsphp81-imagick lsphp81-ldap && systemctl restart lswsSSL Certificates On the Second Server
To ensure mail can still be sent from the second server we must make sure that the correct certificates are in place. If you are following our Postfix series we configured SSL certificates for Webmail and Dovecot in Part 6 – Configure Multiple Email Domains in Postfix Email Server. We combined multiple certificates into a single certificate called m1.relay.gb.net with the command below. Our Webmail certificate is included in this.
certbot certonly -d m1.relay.gb.net -d mail.wsc.pw -d webmail.relay.gb.net --cert-name m1.relay.gb.netInterestingly, I ran a stat on that file and noticed it is now symbolically linked.
root@m1:/usr/local/lsws/logs# stat /etc/letsencrypt/live/m1.relay.gb.net/privkey.pem
  File: /etc/letsencrypt/live/m1.relay.gb.net/privkey.pem -> ../../archive/m1.relay.gb.net/privkey5.pem
  Size: 42              Blocks: 0          IO Block: 4096   symbolic link
Device: 801h/2049d      Inode: 258839      Links: 1
Access: (0777/lrwxrwxrwx)  Uid: (    0/    root)   Gid: (    0/    root)
Access: 2024-04-01 14:42:27.627660231 +0100
Modify: 2024-03-30 12:09:50.944294904 +0000
Change: 2024-03-30 12:09:50.944294904 +0000
 Birth: 2024-03-30 12:09:50.944294904 +0000
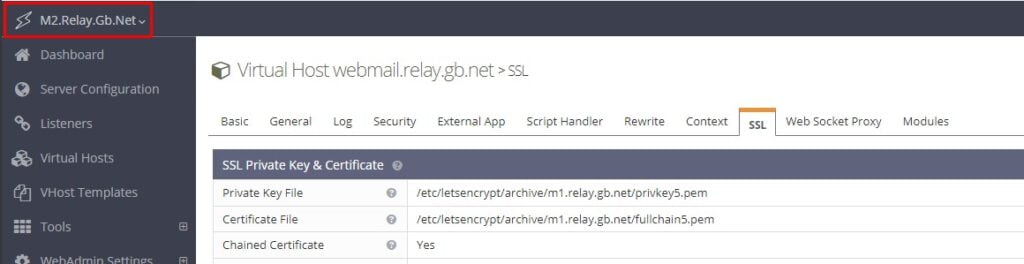
It’s linked to a certificate called /etc/letsencrypt/archive/m1.relay.gb.net/fullchain5.pem and the privkey is linked to another certificate called /etc/letsencrypt/archive/m1.relay.gb.net/privkey5.pem. So these are the certificates that need to be accessible from both servers. Copy the certificates to the NAS.
mkdir /nas/ssl
cp -R /etc/letsencrypt /nss/ssl
The path to the SSLs in the shared storage will now be;
/nas/ssl/letsencrypt/archive/m1.relay.gb.net/privkey5.pem
/nas/ssl/letsencrypt/archive/m1.relay.gb.net/fullchain5.pem
Now in the LiteSpeed control panel for both servers update navigate to Virtual Hosts and select the virtual host for Webmail. Click SSL and update the path to the fullchain.pem and privkey.pem files located in the NAS. Our virtual hosts now look like this.

Restart LiteSpeed and Detached PHP processes
systemctl restart lsws && killall -9 lsphpUpdate DNS For Webmail
Next, on your A record for webmail on your domain. Update the IP address to reflect the IP of your second server. You should be able to log in and all of your mail should be there. If you send an email and inspect the headers, you will notice that even though you are using Webmail on the second server. The mail is sent from the first server. This confirms everything is fine so far.
Delivery-date: Tue, 02 Apr 2024 00:02:48 +0100
Received: from m1.relay.gb.net ([151.xx.xx.86]:53628)
Can you see how it’s all now slotting together? You now have two Postfix High Availability servers. Both work with PostFixAdmin and Webmail. You can send mail from either server using Webmail. However, you can’t yet use a client like Thunderbird on the second server. So let’s now look at this.
Using POP on Two Servers
If you remember, a lifetime ago in Part 2 – Install Dovecot IMAP/POP3 with SSL/TLS. We configured Dovecot to use an SSL certificate located at;
smtpd_tls_cert_file=/etc/letsencrypt/live/m1.relay.gb.net/fullchain.pem
smtpd_tls_key_file=/etc/letsencrypt/live/m1.relay.gb.net/privkey.pem
We have just found out that when we combined multiple certificates into one in Part 6 – Configure Multiple Email Domains in Postfix Email Server. The certificate was symbolically linked to;
/etc/letsencrypt/archive/m1.relay.gb.net/fullchain5.pem
/etc/letsencrypt/archive/m1.relay.gb.net/privkey5.pem
This is fine for our first server. But the second server won’t have access to these certificates. It’s also using a different name. Therefore when you try to connect to the second server with a client. A warning will appear because the certificate does not match the domain you are trying to connect to. When we introduce a load balancer, the balancer will be configured on mail.relay.gb.net and the balancer will connect to the two backend Postfix servers using their hostnames. This should prevent any warnings.
Test Second Postfixadmin High Availability Server
Right about now, if you create a new email account in PostFixAdmin and set up that account in an email client like Thunderbird. You should be able to send a test email. Update the MX record on your domain to point to the second server’s IPv4. Deploy the email account using the second server’s hostname as the incoming and outgoing mail servers. Try to send an email.
Email Headers
From: Dev <s2@relay.gb.net>
Content-Type: text/plain; charset=UTF-8; format=flowed
Content-Transfer-Encoding: 7bit
X-Spam-Status: Yes, score=8.0
X-Spam-Score: 80
X-Spam-Bar: ++++++++
X-Spam-Report: Spam detection software, running on the system "litespeed.xxxx.com",
 has identified this incoming email as possible spam.  The original
 message has been attached to this so you can view it or label
 similar future email.  If you have any questions, see
 root\@localhost for details.
 Content preview:  test
 Content analysis details:   (8.0 points, 4.0 required)
  pts rule name              description
 ---- ---------------------- --------------------------------------------------
  4.0 SPF_FAIL               SPF: sender does not match SPF record (fail)
 [SPF failed: Please see http://www.openspf.org/Why?s=mfrom;id=s2%40relay.gb.net;ip=51.89.170.247;r=litespeed.xxxxx.com]
  2.0 PYZOR_CHECK            Listed in Pyzor
                             (https://pyzor.readthedocs.io/en/latest/)
  2.0 RDNS_NONE              Delivered to internal network by a host with no rDNS
  0.0 KAM_DMARC_STATUS       Test Rule for DKIM or SPF Failure with Strict
                             Alignment
X-Spam-Flag: YES
Subject:  ***SPAM***  test
Whilst the email was marked as spam. The only thing that matters at the moment is that you can send mail when using the second Postfix High Availability email server. You might not be able to receive mail at this point on the second server due to the SPF policy agent missing. We will configure SPF and DKIM in the next article along with our Load balancer.
Troubleshooting
Mkdir Permission Denied Errors
Error: mkdir(/var/dovecot/indexes/relay.gb.net/s1@relay.gb.net) failed: Permission denied (euid=2000() egid=2000() missing +w perm: /var/dovecot/indexes, dir owned by 0:0 mode=0755)This error indicates that your /var/dovecot/indexes folder does not have the correct permissions. The folder should be owned by vmail and have 755 permissions.
chown -R /var/dovecot/indexes && chmod 755 /var/dovecot/indexesPermission Errors On Shared (NAS) Virtual Mail Directory
Error: chdir(/nas/vmail/relay.gb.net/s1//) failed: Permission denied (euid=2000(<unknown>) egid=2000(<unknown>) missing +x perm: /nas/vmail/relay.gb.net/s1/, dir owned by 119:1000 mode=0700)This error is interesting. To achieve Postfixadmin High Availability. The /nas/vmail directory is mounted in both servers. In one server (m1) the UID and GID for the folder is 2000(vmail):2000(vmail) but in the other, the vmail user and group were using a different UID and GID. When adding a test email account using the second Postfix server we received permission denied errors in Thunderbird. The client would not create our folders nor would it receive or send mail. A NOPERM and Permission denied error was displayed. Upon investigation, this was because of the difference in UID and GID. Our Dovecot couldn’t read the /nas/vmail NAS share.
Resolution
First, stop Postfix and Dovecot on the second server. Then unmount the NAS folder.
systemctl stop postfix dovecot && unmount /nas

# Delete vmail user and group

userdel vmail && groupdel vmail

# Add vmail user with the same UID as the other server(s). Use the stat/nas command to find the
# UID

adduser vmail --system --group --uid 2000 --disabled-login --no-create-home

# Add the vmail group

groupadd vmail

# Reapply permissions to the /var/dovecot/indexes file

chown -R vmail:vmail /var/dovecot/indexes
If you made it this far, well done. This was technical but the end result is that you now have two Postfixadmin Email servers that are almost ready for High Availability. Now we can move on to the final article where we will configure DKIM, SPF and in the final article we will start Load Balancing.
Next Article – Configure SPF & DKIM on the second Postfix Server